- Assess the Moisture Source — Before you even think about cleaning, figure out where the water's coming from. This is critical.
- Look Up: Examine the roofline. Any missing shingles? Flashing issues? A small roof leak can channel water down behind siding.
- Irrigation Check: Is your sprinkler system hitting the side of the house directly? Adjust those heads!
- Windows & Doors: Check for deteriorated caulking around window and door frames. Water can sneak in here and migrate.
- Ground Level: Is the soil graded away from your house with a minimum 6-inch drop over 10 feet? If not, rainwater will sit and soak the ground, wicking up into your foundation and maybe behind your siding too.
Roofing · Aging roof
| Project category | Roofing |
|---|---|
| Problem type | Aging roof |
| Trade required | Roofing |
| Urgency | Planned project |
| Safety risk | Low safety risk |
| DIY suitability | Pro recommended |
| Cost category | High cost |
| Typical timeline | Plan 4–12 weeks ahead for scheduling and material lead time |
| Contractor type | Licensed roofing contractor |
Repair option
Maintenance repairs to buy a season or two while you budget.
Replacement option
Planned replacement, which is almost always cheaper than a leak-driven emergency.
Common causes
- Normal weathering past the shingle service life
- Poor attic ventilation cooking the shingles from below
- Repeated repairs on the same slopes
Relevant tools:repair or replace roofproject cost estimatorhome improvement material prices
Published September 23, 2026Last updated September 23, 2026
Tools & materials you'll need
Affiliate linksAs an Amazon Associate FixlyGuide earns from qualifying purchases — at no extra cost to you. Prices and availability are accurate as of publication and subject to change.
Quick Answer
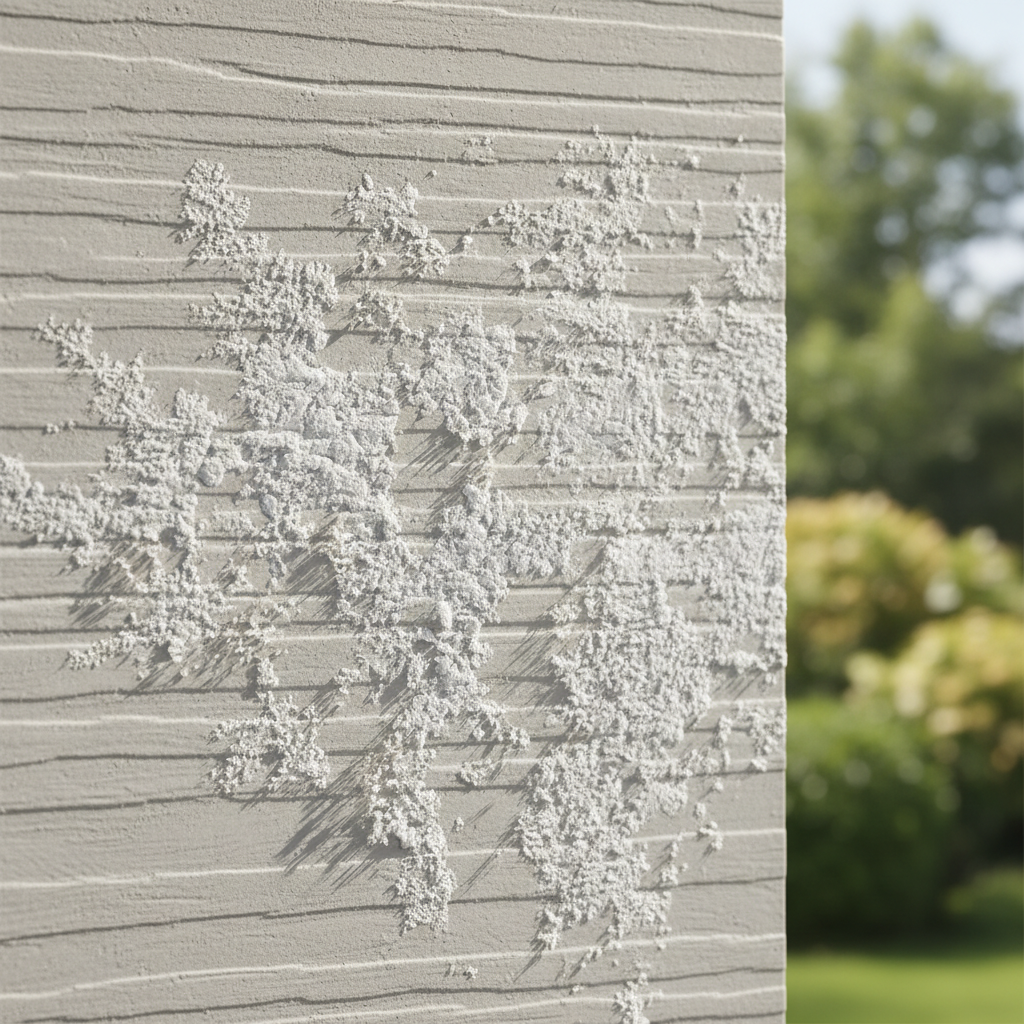
That chalky white junk on your siding isn’t just ugly — it’s usually efflorescence. I’ve seen it plenty, and it happens when moisture carries dissolved mineral salts through the siding, then the water evaporates and leaves the salts behind. It’s not just a cosmetic nuisance; it means water’s getting behind or into the material, and that can snowball into mold, rot, or even structural damage if you let it ride. Your best move is to clean it up, then track down and seal the moisture source so it doesn’t keep coming back.
The Problem
Picture this: it’s a nice sunny afternoon, you’re looking over the house, and there it is — a ghostly white film, sometimes crusty, sometimes just powdery, stuck to your siding. I run into this all the time, especially on stucco, brick, and older fiber cement boards. Homeowners call me, scratching their heads, wondering if it’s mold, mildew, or some weird chemical spill. Nine times out of ten, it’s efflorescence.
Here’s what’s going on: water is getting into or behind the siding. As it moves, it grabs soluble salts from the material itself — or from masonry behind the siding, or even from soil if it’s wicking up from the foundation. Then the sun hits, the water evaporates off the surface, and the salts crystalize right there. That’s the white powder you’re seeing. It’s not just a bad look; it’s a loud little warning that your moisture control isn’t doing its job. If water can get out carrying salts, it can get in and do damage. I’ve seen houses where folks ignored this and ended up with rotted sheathing and framing underneath — what started as a simple cleaning job turned into a five-figure repair. No thanks.
How It Works
Efflorescence makes more sense once you understand water and porous materials. Think of siding — especially fiber cement, stucco, brick, or even some composite materials — like a sponge, just a pretty dense one. When it rains, or a gutter leaks, the material soaks up water. That water isn’t pure; it’s carrying dissolved minerals from the ground, the air, or the siding itself. Then the sun comes out or the wind kicks up and dries the surface. The moisture inside gets pulled toward the outside through capillary action — same idea as a paper towel sucking up a spill. When it reaches the surface, the water evaporates, but the mineral salts don’t. They stay put. Voilà — white residue.
On fiber cement, you’re often seeing calcium carbonate leaching out of the cement binders. On brick or stucco, it might be sulfates or chlorides from the mortar or plaster. Repeated wetting and drying cycles make it worse, so poor drainage, overflowing gutters, or sprinklers spraying the house directly can really crank it up. Heat matters too. Warmer temps speed evaporation, which makes the efflorescence show up faster. It’s a loop: water gets in, grabs salts, moves to the surface, evaporates, salts stay behind. Break that loop and you’ve got a real shot at stopping it. The powder itself isn’t the enemy — the path the water took is. That’s the part that can hurt you.
Step-by-Step Fix
Here’s how I handle efflorescence. Don’t just blast it off and call it a day.
-
Assess the Moisture Source — Before you even think about cleaning, figure out where the water's coming from. This is critical.
- Walk the Perimeter: Check your gutters and downspouts. Are they clogged? Are they overflowing? Is the water being directed at least 5-6 feet away from your foundation? If water is pooling near the house, that's a big red flag. I once found a downspout dumping water straight into a flowerbed against a client’s house in Maple Shade — efflorescence was climbing two feet up the stucco.
- Look Up: Examine the roofline. Any missing shingles? Flashing issues? A small roof leak can channel water down behind siding.
- Irrigation Check: Is your sprinkler system hitting the side of the house directly? Adjust those heads!
- Windows & Doors: Check for deteriorated caulking around window and door frames. Water can sneak in here and migrate.
- Ground Level: Is the soil graded away from your house with a minimum 6-inch drop over 10 feet? If not, rainwater will sit and soak the ground, wicking up into your foundation and maybe behind your siding too.
-
Gather Your Tools & Prep the Area — Get everything ready. Protect plants and yourself.
- Tools: Stiff nylon brush (never wire brush on siding!), garden hose with a spray nozzle, buckets, painter's tape, plastic sheeting.
- Safety: Eye protection, rubber gloves, long sleeves and pants. Efflorescence cleaners can be acidic.
- Protect Plants: Cover any nearby landscaping with plastic sheeting. Tape it down so runoff doesn't wreck the shrubs.
-
Test a Small, Inconspicuous Area — Don't just dive in. Always test.
- Mixture: Start with a diluted solution if using a chemical cleaner (e.g., 1 part cleaner to 10 parts water, or per manufacturer's instructions). For most light efflorescence, a simple solution of 1 cup white vinegar to 1 gallon of water or a specialized efflorescence remover is usually enough. For heavy build-up, you might need a more potent solution.
- Apply & Observe: Apply to a small patch, let it sit for 5-10 minutes, and gently scrub. Rinse thoroughly. Check for any discoloration or damage to the siding material.
-
Wet the Siding Thoroughly — Don't let the cleaner dry on the surface.
- Pre-wetting: Use your garden hose to thoroughly wet the entire area you plan to clean. This helps prevent the cleaning solution from being absorbed too quickly and reduces the risk of streaking or damage.
-
Apply the Cleaning Solution — Work in manageable sections.
- Application: Apply your chosen cleaning solution from the bottom up, working in sections about 5x5 feet. This helps prevent streaking. Don't let the solution dry on the siding.
- Solution Options: For light efflorescence, a mild detergent and water, or a 50/50 white vinegar and water mix, often does the trick. For heavier cases, an acidic cleaner specifically designed for efflorescence (like SureKlean 600 or similar masonry cleaners) might be necessary. Never mix bleach with acidic cleaners; it creates toxic gas.
-
Scrub the Efflorescence Away — Elbow grease time.
- Brushing: Use your stiff nylon brush to gently but firmly scrub the affected areas. Work the solution into the powdery residue. You should see it start to break down and dissolve.
- Repeat if Needed: For stubborn spots, reapply the solution and scrub again. Be patient; sometimes it takes a few passes.
-
Rinse Thoroughly — Get all that cleaner off.
- Rinsing: Starting from the top of the cleaned section, thoroughly rinse with clean water from your garden hose. Ensure all cleaning solution and dissolved efflorescence is washed away. Rinse any surrounding areas as well to prevent runoff streaks.
-
Allow to Dry and Inspect — See your results.
- Drying Time: Let the siding dry completely, which might take several hours on a warm, sunny day. Once dry, inspect the area. Is the white powder gone? If not, you might need to repeat the cleaning process or consider a stronger cleaner.
-
Address the Moisture Source (The Real Fix!) — This is the most crucial step.
- Repair Gutters: Clean out gutters, repair leaks, and ensure downspouts extend away from the foundation. Use splash blocks or downspout extenders.
- Improve Drainage: Regrade soil if it slopes towards the house. Install French drains if persistent pooling is an issue. Consider a gravel perimeter to prevent splash-back.
- Seal Cracks: Use a high-quality, exterior-grade sealant (like a polyurethane or silicone caulk) to seal any visible cracks in the siding, mortar, or around windows and doors. For fiber cement, ensure paint is well-maintained as paint acts as a protective layer.
- Ventilation: Ensure attic and crawl spaces are properly ventilated to reduce interior moisture that could migrate outwards.
-
Consider a Penetrating Sealer (Optional, but Smart) — For persistent issues on masonry or stucco.
- Application: Once the siding is completely dry and the efflorescence is gone, you can apply a breathable, penetrating sealer to brick, stucco, or unpainted fiber cement. This creates a barrier that prevents water absorption while still allowing the material to "breathe" and release any trapped moisture. Follow manufacturer's instructions for application and drying times. This isn't a magic bullet if you haven't fixed the underlying water problem, but it's a good extra line of defense.
Common Causes
- Poor Drainage & Grading: Water pooling near the foundation or soil sloping towards the house is a huge culprit. It soaks the ground and the foundation wicks moisture up.
- Clogged or Damaged Gutters/Downspouts: Overflowing gutters dump gallons of water directly onto your siding and foundation, creating prime conditions for efflorescence.
- Missing or Damaged Flashing: Around windows, doors, and rooflines, flashing directs water away. If it's compromised, water gets behind the siding.
- Leaky Roofs or Pipes: Even a small leak can send water down behind your siding, leading to efflorescence in unexpected spots.
- Cracked Siding or Mortar Joints: Any opening in the exterior finish allows water to penetrate the porous material underneath.
- High Groundwater Levels: In some areas, high water tables can contribute to moisture wicking up into foundations and walls.
- New Construction & Curing: It's common to see efflorescence on new masonry or concrete as it dries and cures. This usually dissipates over time as the free salts are flushed out.
Common Mistakes
- Ignoring the Source: Just cleaning the efflorescence without fixing the underlying moisture problem is like bailing water from a leaky boat without patching the hole. It'll just come back.
- Using a Wire Brush: On most siding materials, especially fiber cement, stucco, or brick, a wire brush is too abrasive. It can scratch or damage the surface, making it more porous and more prone to efflorescence later. Stick with a stiff nylon or natural bristle brush.
- Not Testing Cleaners: Some strong acidic cleaners can etch or discolor certain types of siding. Always do a spot test in an inconspicuous area first to make sure the material can handle it.
- Letting Cleaners Dry: Allowing cleaning solutions to dry on the siding can leave streaks or damage the finish. Always pre-wet the surface and rinse thoroughly.
- Mixing Chemicals: Never, ever mix different cleaning chemicals, especially bleach with acids. The fumes can be extremely dangerous, even lethal. If you're not sure, stick to one product or just soap and water.
- Applying Sealer Too Soon: If you apply a sealer before the wall is completely dry, you're trapping moisture inside, which can lead to other issues like blistering paint or mold.
Cost & Time Breakdown
| Task | DIY Cost | Pro Cost | Time |
|---|---|---|---|
| Materials/Supplies | $20–$75 | Included in service | 15–30 minutes |
| Cleaning Efflorescence | Free (DIY labor) | $200–$600+ | 1–3 hours |
| Gutter Cleaning/Repair | $0–$50 | $100–$300 | 30 min – 2 hours |
| Minor Caulk/Sealant Repair | $10–$30 | $50–$150 | 30 min – 1 hour |
| Regrading/Drainage Correction | $50–$500+ | $500–$3,000+ | 4 hours – 2 days |
| Sealer Application (Optional) | $30–$100 | $200–$500+ | 1–2 hours |
Tips & Prevention
- Regular Gutter Maintenance: Clean your gutters twice a year, in spring and fall. Make sure downspouts are clear and sending water away from the house by at least 5 feet. Downspout extenders are cheap, and I’ll tell you straight — they’re some of the best money you’ll ever spend to avoid moisture headaches.
- Maintain Proper Grading: Walk around your house after a rain shower. If water is pooling or standing near the foundation, you've got a grading issue. Keep a minimum 6-inch slope away from the foundation over the first 10 feet.
- Inspect Caulking Annually: Check around all windows, doors, and utility penetrations (hose bibs, dryer vents) for cracked, brittle, or missing caulk. Reapply exterior-grade caulk as needed. It’s a yearly chore, sure, but it saves you a pile of grief.
- Mind Your Irrigation: Adjust sprinkler heads so they don't directly spray your siding or saturate the foundation continuously. A small tweak can make a big difference.
- Good Exterior Paint (for Fiber Cement/Wood): For painted siding, a well-maintained, high-quality exterior paint acts as a crucial moisture barrier. If your paint is peeling or faded, water can get in and cause efflorescence, especially on fiber cement.
- Vapor Barriers: Ensure proper vapor barriers are installed in crawl spaces and basements to prevent ground moisture from migrating into your home's structure.
When to Call a Professional
Cleaning efflorescence is usually a DIY job, but knowing when to bring in the cavalry matters. If you’ve cleaned it, fixed the obvious stuff like gutters and grading, and it keeps coming back, you’ve probably got a deeper issue. Could be a hidden plumbing leak behind the wall, compromised house wrap, foundation cracks letting in water, or a bigger drainage problem that needs excavation. If you suspect structural damage, serious wood rot, or mold inside the walls, that’s the time to pick up the phone. A qualified pro — general contractor, masonry specialist, or foundation repair expert — can dig deeper, often with thermal cameras or moisture meters, to find the real source and lay out the right repair. I pulled a water heater in Frisco last month that had exactly this kind of hidden moisture trail, and the stain on the siding was just the tip of the iceberg. Don’t mess around with hidden water; it’s one of a homeowner’s worst enemies.
Related Articles
Keep troubleshooting with these hand-picked guides from FixlyGuide:
- The Unseen Danger After a Storm: What to Do About a Sagging Roof Deck — A sagging roof deck after a storm isn't just an eyesore; it's a serious structural problem that demands immediate attention to prevent coll…
- The Mystery of the Loose Siding Panel: Why It Flaps and How to Fix It Right — Loose siding panels aren't just an eyesore; they can lead to serious water damage if not addressed quickly. Learn why your siding is flappi…
- The Ugly Truth About Chalky Siding (And Your Simple 3-Hour Fix) — Don't let faded, chalky siding ruin your home's curb appeal. This guide explains why it happens and gives you a straightforward, effective…
- Your Insulation Isn't the Problem: Why Your Attic Still Bakes — Even with thick insulation, a hot attic signals a critical ventilation failure that could be silently damaging your roof and driving up you…
- That Brown Stain Above Your Shower Isn't a Roof Leak — Discover why that ugly brown stain on the ceiling below your attic bathroom vent is more likely caused by condensation from your shower tha…
- That White Crust On Your Faucet? It's A Big Problem — That chalky, white buildup on your fixtures isn't just ugly—it's limescale from hard water, and it's actively clogging, corroding, and ruin…
Should you do this yourself?
Answer five quick questions before you start. Safety outranks savings every time.
Your experience with work like this
How high do you have to work?
Does the job involve any of these?
Will it need a permit?
Specialty tools
Free and instant. Educational guidance only — not a quote, inspection, or professional diagnosis.
What should this project cost?
Enter your project details for a realistic cost range before you call anyone.
Spot repairs commonly run $400–$1,800; full replacement typically $9,000–$18,000 for an average home.
- Regional adjustment
- National average
- Labor share (typical)
- ~$2,948
- Quotes to collect
- 3 written estimates
Educational estimate based on national averages — not a binding quote. Always confirm with written local estimates.
Decide what your roof needs
Two minutes of questions turns "something is wrong up there" into a clear next step.
- Repair or replace your roof?Answer 10 questions about age, leaks, and damage to get a clear next step.Open
- Compare contractor quotesScore up to four bids on price, warranty, licensing, and timeline.Open
- Get local estimatesSend one request and compare written estimates from vetted pros.Open
Free, no signup required. Estimates are educational guidance, not a quote or an inspection.
Get the print-ready PDF of this guide
A clean, ad-free, printable version you can keep on your phone or pin to the workshop wall. Free with a FixlyGuide account.
- Print-optimized layout
- Tools, materials & every step included
- Saved to your account
Frequently asked questions
What exactly is the white powder on my siding?+
The white powder is almost always efflorescence, which are mineral salts left behind when water evaporates from porous building materials like brick, stucco, concrete, or fiber cement siding. It's a natural process when moisture is present.
Is efflorescence harmful to my siding or home?+
Efflorescence itself isn't directly harmful to the siding material, but its presence is a clear indicator of a moisture problem. The water causing it can lead to more serious issues like mold, mildew, rot in wood framing, or degradation of insulation if left unaddressed.
Can I just paint over efflorescence?+
No, absolutely not. Painting over efflorescence is a temporary fix at best. The moisture and salts will eventually push through the new paint, causing it to peel, bubble, or stain. You must clean the efflorescence and fix the moisture source first.
What's the best way to clean efflorescence?+
For light cases, a stiff nylon brush with a solution of water and white vinegar (50/50) or a mild detergent can work. For heavier buildup, you might need a specialized acidic efflorescence remover, always following manufacturer instructions and testing in an inconspicuous area first.
How do I prevent efflorescence from coming back?+
The most important step is to address the underlying moisture source. This means checking and repairing gutters, ensuring proper ground grading away from your foundation, sealing cracks in siding or masonry, and ensuring adequate ventilation to prevent water intrusion.
Can efflorescence appear on vinyl siding?+
It's less common for efflorescence to appear directly *on* vinyl siding itself because vinyl is non-porous. However, you might see efflorescence *behind* or *underneath* vinyl siding, often originating from masonry or concrete foundation walls, which then becomes visible where panels overlap or are slightly open.
Is pressure washing good for removing efflorescence?+
Pressure washing can remove the surface efflorescence, but it carries risks. Too much pressure can damage siding materials, especially softer ones like stucco or older fiber cement. It can also force water *behind* the siding, exacerbating the moisture problem. A garden hose with a spray nozzle and manual scrubbing is generally safer and more effective for this specific issue.
How long does it take for efflorescence to go away after fixing the moisture issue?+
Once the moisture source is completely eliminated and the existing efflorescence is cleaned, new efflorescence shouldn't reappear. However, it might take a few weeks or months for any residual moisture and salts deep within the material to fully dry out and stop migrating to the surface.
What if I see efflorescence on new construction?+
Efflorescence is actually quite common on new masonry or concrete during the initial drying and curing phases. As the materials dry, trapped moisture carries salts to the surface. It usually diminishes over the first year as the salts are flushed out. If it persists, then it indicates an ongoing moisture issue that needs investigation.

Discussion
Loading comments…