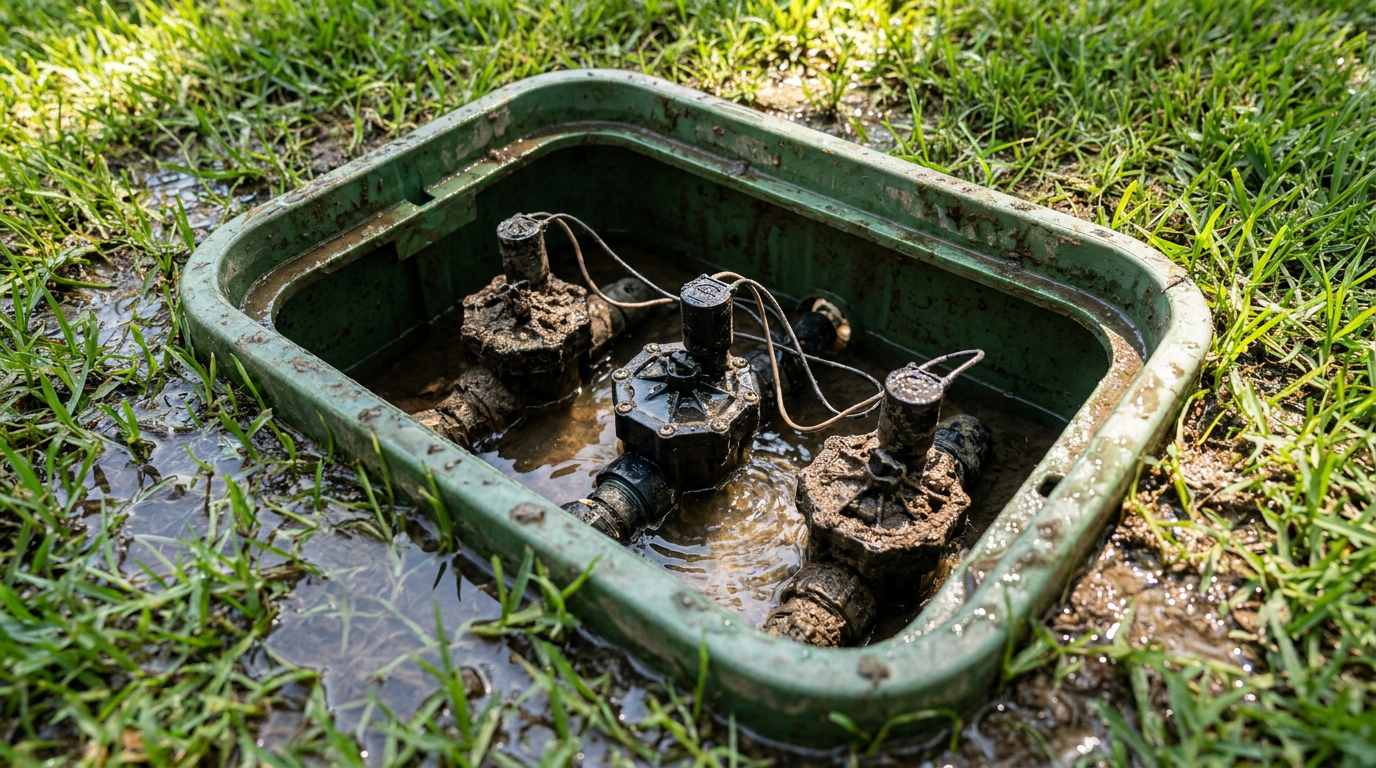
- Isolate the runaway zone's valve box — Find the green, rectangular, or round plastic lid sitting flush with the grass, and pry it up with a flathead screwdriver.
- Match it to the heads that are running; a lot of boxes hold three to five valves manifolded together.
- If you can’t tell which one’s acting up, turn the water back on for five seconds while you watch the box—the live valve often buzzes or hums a little under flow.
Landscaping · Deck or fence project
| Project category | Landscaping |
|---|---|
| Problem type | Deck or fence project |
| Trade required | Landscaping |
| Urgency | Planned project |
| Safety risk | Moderate safety risk |
| DIY suitability | DIY for experienced homeowners |
| Cost category | High cost |
| Typical timeline | Most builds 3–10 days depending on size |
| Contractor type | Landscaping contractor |
Repair option
Replace failed boards, posts, and hardware; reseal the surface.
Replacement option
Rebuild when framing or the ledger connection is unsafe.
Common causes
- Rot at posts and ledger
- Storm damage
- Adding outdoor living space
Relevant tools:home improvement material pricesproject cost estimator
Published November 15, 2026Last updated November 15, 2026
Tools & materials you'll need
Affiliate links- Amazon#2 Phillips screwdriverFor removing valve bonnet screws
- AmazonFlat-blade screwdriverFor prying open valve box lids and debris clearing
- AmazonSmall wire brush or old toothbrushFor cleaning diaphragm valve seat
- AmazonClean 5-gallon bucketFor washing internal valve parts
- AmazonThin copper wire or sewing needleFor clearing the tiny diaphragm metering port
- AmazonSmall garden trowelFor digging out mud around valve body
- AmazonSponge or hand siphon pumpTo remove standing water from valve box
- AmazonReplacement diaphragm or matching inline valveMatch your valve brand (Rain Bird, Hunter, Toro, etc.)
As an Amazon Associate FixlyGuide earns from qualifying purchases — at no extra cost to you. Prices and availability are accurate as of publication and subject to change.
Quick Answer
If a single sprinkler zone won’t shut off, I’d bet money the problem’s in that zone’s in-line valve box, not the wall controller. A little grain of sand under the rubber diaphragm, or a torn gasket, keeps the valve from seating closed, so city water pressure just keeps feeding the heads. Shut off the main irrigation valve, back the solenoid off to bleed the pressure, then pop the bonnet and flush out the junk or swap the diaphragm assembly.
The Problem
You head out to the yard hours after the morning watering cycle ended, and water’s still bubbling up out of four or five sprinkler heads. The other zones? Dead quiet. You go to the garage, hit "Cancel" or "System Off" on the timer, and... nothing. The water keeps on going.
That’s when the panic starts. Your water meter’s spinning like crazy, and your lawn’s turning into a muddy mess.
When one zone won’t shut down and the rest of the system is acting normal, folks usually blame the controller on the garage wall. Nine times out of ten, that’s the wrong target. In 95% of cases, the controller isn’t sending any juice to that zone at all, but water’s still getting through anyway. The failure is mechanical, tucked out in the turf inside an in-ground plastic valve box. Figure that part out, and you can shut it down without coughing up an emergency $250 plumbing service call.
How It Works
Automatic irrigation zones use pilot-operated diaphragm valves. Fancy name, simple idea. They work off hydraulic pressure, not brute electrical force. Inside the valve body is a flexible rubber disc—the diaphragm—pressed down against a raised center seat by water pressure.
When the zone is off, water fills two chambers: the inlet chamber beneath the diaphragm and the bonnet chamber above it. Since the top surface area of the diaphragm is about 20% larger than the bottom surface area, the downward hydraulic force wins. It presses that rubber tight against the plastic valve seat and shuts off flow to your yard.
To open the zone, your controller sends a 24-volt AC signal through buried copper wire to a little magnetic cylinder called a solenoid. That energized solenoid lifts a spring-loaded metal plunger and opens a tiny bleed port. Water dumps out of the upper chamber faster than it can refill. Pressure drops above the diaphragm. Then the high-pressure city water underneath it—usually 45 to 70 PSI—pushes the rubber up and opens the gate to the sprinkler heads.
To shut the zone off, the controller cuts the 24V current. The solenoid drops the plunger back down and seals the exhaust port. Water slowly slips back into the upper chamber through a microscopic metering hole in the diaphragm. As pressure evens out, that bigger top surface area forces the diaphragm down onto the valve seat. If grit clogs that little metering hole, or debris gets stuck under the diaphragm edge, the upper chamber can’t build pressure—and your sprinklers will run until kingdom come.
Step-by-Step Fix
Before you start digging around in the flower beds, grab a flat-blade screwdriver, an old toothbrush, and a clean bucket. Go slow. You don’t want dirt falling into an open valve.
-
Cut the main irrigation water supply — Find your dedicated backflow preventer assembly (usually above ground in copper) or the buried irrigation shutoff valve near your street water meter, then turn the ball valve handle a quarter-turn so it’s perpendicular to the pipe.
- Never take apart an irrigation valve under pressure; a 60 PSI geyser will throw parts across the lawn and soak the solenoid wiring.
- If you don’t have a dedicated cutoff, shut off the main municipal water supply to the whole house.
-
Isolate the runaway zone's valve box — Find the green, rectangular, or round plastic lid sitting flush with the grass, and pry it up with a flathead screwdriver.
- Match it to the heads that are running; a lot of boxes hold three to five valves manifolded together.
- If you can’t tell which one’s acting up, turn the water back on for five seconds while you watch the box—the live valve often buzzes or hums a little under flow.
-
Clear dirt and roots from around the valve — Dig out 2 to 3 inches of mud, pea gravel, and creeping Bermuda grass from around the valve body with a garden trowel.
- The bonnet lip needs to sit cleanly above any sloppy muck so loose soil doesn’t fall into the valve when you open it up.
- Sponge out, or siphon off, any standing water in the plastic box.
-
Verify manual bleed screws and solenoid position — Check whether the manual bleed lever or the cylindrical solenoid with two wires is threaded down hand-tight.
- Somebody—maybe even a lawn crew—might’ve backed the solenoid off a quarter-turn, which bypasses the controller and holds the valve open hydraulically.
- Snug the solenoid down clockwise by hand; if the water stops when you turn the main back on, you’re done. No dice needed beyond that.
-
Mark the valve bonnet orientation — Use a permanent marker to draw a quick alignment line across the top plastic lid (the bonnet) and the bottom body.
- If you put the bonnet back 180 degrees off, you can crush the internal flow-control stem or misalign the solenoid exhaust port, and then the valve won’t seat right later.
-
Back out the bonnet screws evenly — Use a #2 Phillips screwdriver or a small socket (typically 5/16-inch depending on valve brand) to loosen the perimeter screws holding the valve together.
- Work opposite screws in a crisscross pattern so spring pressure underneath doesn’t snap the plastic retaining tabs.
- Keep your palm pressed on top of the bonnet while you pull the last two screws so the internal stainless steel spring doesn’t pop the lid loose.
-
Inspect the diaphragm and center seat — Lift off the plastic bonnet and carefully remove the heavy coil spring and flexible rubber diaphragm assembly underneath.
- Look hard at the circular plastic rim (the seat) inside the bottom valve housing; run a bare finger over it for tiny nicks, scratches, or stuck pebbles.
- Even one grain of decomposed granite or a bit of calcium scale on that seat can leave a gap big enough to dump 15 gallons per minute out to the heads.
-
Check the rubber diaphragm for tears or pinholes — Hold the rubber disc up to the sunlight and gently stretch the edges with your fingers.
- Look for hairline stress cracks around the perimeter hinge, tears near the center plastic support, or warping from chlorine wear.
- If the rubber feels sticky, stiff, or torn, don’t waste time cleaning it—just install an exact-match replacement diaphragm kit from your local irrigation supply house.
-
Clear the metering port — Find the pinhole-sized opening in the rubber diaphragm or the tiny brass bypass tube inside the bonnet, and run a thin strand of copper wire or a sewing needle through it.
- Don’t drill it bigger or jab it with a nail; changing the hole size throws off the valve’s hydraulic closing timing.
- Scrub both sides of the rubber and the plastic housing with an old toothbrush dipped in clean water.
-
Reassemble the valve housing — Set the cleaned or new diaphragm back into the valve body, drop the stainless steel spring into the center cup, and lower the bonnet straight down using your alignment mark.
- Hand-thread every screw first so you don’t cross-thread the soft plastic base.
- Tighten the screws gradually in an alternating X-pattern to roughly 15 to 20 inch-pounds of torque; crank them too hard and you’ll warp the bonnet and end up with an outside seam leak.
-
Perform a controlled system repressurization — Walk back to your backflow preventer or street shutoff and open the ball valve very slowly over 30 to 45 seconds.
- If you slam the water main open, you can send a nasty water hammer pressure spike (exceeding 120 PSI) down the PVC line, busting fittings or knocking the new diaphragm out of place.
- You’ll hear water surge into the pipes for 10 to 20 seconds, and then—if the repair held—you should hear a solid "thunk" as the diaphragm snaps shut and the flow quits completely.
Common Causes
So why do these valves fail to seal in the first place? Five usual suspects cause just about every runaway sprinkler zone I’ve seen:
- Debris wedged on the valve seat: A little PVC burr from an old repair, rust flake from galvanized city lines, or a grain of coarse sand lands right on the raised plastic circular rim. The rubber diaphragm can’t flatten out, so water slips past nonstop.
- Torn, warped, or hardened diaphragm: Rubber breaks down over 7 to 12 years. City water treated with chlorine or chloramines slowly leaches plasticizers out of the rubber compound, leaving the diaphragm brittle, warped, or split along the hinge line.
- Clogged metering orifice: The tiny channel feeding water into the upper bonnet chamber gets packed with silt or organic biofilm. Without water to fill that top chamber, downward hydraulic pressure drops to zero, and the valve stays wide open.
- Stuck solenoid plunger: Hard water deposits (calcium carbonate) or corrosion can lock the internal metallic plunger inside the solenoid sleeve in the "up" (retracted) position. The pilot port stays vented to daylight or the downstream pipe.
- Physical bonnet crack or stripped threads: Freeze damage during winter cold snaps or overtightened screws can crack the valve top. That bleeds off upper-chamber pressure outward and keeps the diaphragm from closing.
Common Mistakes
Rushing an irrigation valve repair usually makes a bigger mess. Don’t do these:
- Swapping out the digital controller first. Homeowners love to spend $150 to $250 on a shiny smart Wi-Fi irrigation controller because they think the old one is "stuck on." Controllers almost never fail in a way that keeps a zone electrically latched open. You can test this in five seconds: unplug the controller from the wall outlet. If the sprinkler zone keeps running with zero power, the problem is 100% mechanical.
- Cutting out the entire valve with a hacksaw. Unless the rigid lower plastic valve body is cracked straight down the middle, you do not need to cut buried PVC. Buy the exact same valve model off the shelf for $15 to $25, toss the lower body, and just transplant the brand-new bonnet, spring, diaphragm, and solenoid onto your existing valve base. Saves a ton of dirty digging and PVC glue work.
- Poking oversized tools through the bleed hole. If you jam a thick nail, drill bit, or pocketknife tip through the diaphragm’s rubber metering hole, you’ll wreck the hydraulic flow dynamics. Make that hole bigger and the valve won’t open cleanly again. Use soft copper wire or a toothbrush bristle.
- Neglecting to clean the valve well before opening. Pulling the bonnet off while the valve is sitting in muddy puddle water guarantees gritty slurry will fall into the downstream lateral pipes. When you button it back up, those particles end up in your spray nozzles or right back on the valve seat.
- Cranking bonnet screws down with an impact driver. Power tools have no business anywhere near plastic irrigation valves. An impact driver can strip the plastic female threads out of the lower body in half a second, turning a simple 20-minute fix into a full excavation job.
Cost & Time Breakdown
| Task | DIY Cost | Pro Cost | Time |
|---|---|---|---|
| Manual bleed inspection & valve flush | $0 | $90–$150 | 15–20 mins |
| Diaphragm replacement (internal rebuild) | $12–$25 | $150–$225 | 30–45 mins |
| Solenoid replacement | $10–$20 | $120–$180 | 15 mins |
| Complete valve rebuild (bonnet transplant) | $18–$35 | $175–$250 | 45 mins |
| Full valve cut-out & PVC replacement | $25–$45 | $275–$450 | 2–3 hours |
Tips & Prevention
- Flush lines thoroughly after any pipe repair. Any time you dig up broken PVC lateral lines, mud gets in there. I pulled a water heater in Frisco last month that had exactly this kind of grit problem in the feed line, and irrigation piping’s no different—always unscrew the farthest two sprinkler heads on the line and remove the internal valve guts to flush the pipes at full pressure before running the system normally.
- Exercise valves manually once per year. Twist the manual external bleed screw on every valve box each spring for 10 seconds. That flushes stale silt out of the pilot exhaust passages and keeps solenoids from hanging up on hard-water crust.
- Install an upstream disc filter if on well water. If your irrigation pulls from a pond, canal, or shallow well, microscopic silt will chew up diaphragm valves constantly. Put a 120-mesh disc filter right downstream of your pump or backflow unit.
- Watch for soggy "green halos" between cycles. A weeping valve that won’t seal 100% will quietly bleed water out of the lowest sprinkler head in that zone by gravity. If you see spongy turf or moss around one specific head while the system is off, your diaphragm’s not seating right.
When to Call a Professional
Most homeowners can rebuild an irrigation valve bonnet with a plain screwdriver. But call a licensed irrigation specialist or master plumber if you find the lower valve body itself split or stripped, because cutting into a tight multi-valve manifold takes precise PVC fitting and there’s not much room to mess around.
If your backflow preventer test cocks are spewing water along with the running zone, or if turning the main shutoff valve doesn’t stop the water flow completely, then you’ve got failed shutoff gear upstream and that needs licensed mechanical work.
Frequently Asked Questions
If I unplug the sprinkler controller, will the stuck zone stop running?
Nope, unplugging the controller won’t stop a mechanically jammed valve. Irrigation valves are "normally closed" devices that need continuous electrical current to stay open; when they fail to shut off, it’s almost always because grit, sand, or a torn rubber diaphragm is physically blocking the valve from closing hydraulically. If you unplug the timer and water keeps spraying, the trouble is inside the valve box.
Where is my irrigation valve box located?
Valve boxes are usually buried flush with your lawn or tucked inside landscaping beds near the foundation of your home. Look for dark green or black rectangular plastic lids measuring roughly 12 by 18 inches. If your grass has swallowed them up, gently probe spongy turf with a long, thin screwdriver or metal rod about 2 to 6 inches deep until you hit plastic.
Can I buy just the rubber diaphragm without buying an entire valve?
Yes, most big-box home centers and dedicated irrigation supply houses sell diaphragm repair kits for popular brands like Rain Bird, Hunter, Toro, and Irritrol for $8 to $15. Still, it’s often smarter to buy the whole valve off the shelf for $18 to $25. You can use its brand-new diaphragm, spring, bonnet, and solenoid as replacement parts and leave the lower body in the ground.
How do I know which valve controls which sprinkler zone?
Open the valve box and have a helper turn on specific zones at the controller. You can feel the water flow by resting your hand on the plastic bonnet; the running valve will vibrate a little and feel noticeably colder than the idle ones. Or, gently twist the manual bleed screw on top of a valve a half-turn counter-clockwise—if that makes the problem zone kick on, you found it.
Why does water keep bubbling out of only the lowest sprinkler head?
That’s called "low-head drainage." When a zone shuts off normally, the leftover water inside the lateral pipes slowly drains downhill out of the lowest sprinkler nozzle by gravity. But if that water keeps dripping for hours or days after the cycle ends, your in-line valve isn’t seating all the way and is leaking a steady stream of city water past its damaged diaphragm into the zone.
What causes a sprinkler valve solenoid to fail?
Solenoids fail either electrically or mechanically. Electrically, lightning strikes or power surges can burn out the fine internal copper coil, or corroded underground wire splices can block proper voltage delivery. Mechanically, hard-water mineral deposits can freeze the internal stainless steel plunger inside its sleeve, locking it in the retracted position and leaving the hydraulic exhaust port open all the time.
Do I need to turn off my home's main water to fix an irrigation valve?
Only if your irrigation system doesn’t have its own isolated shutoff valve. Most building codes call for a dedicated irrigation shutoff near your street meter, in the basement, or as part of an exterior backflow preventer assembly (double check or RPZ). Closing the two quarter-turn handles on your backflow device cuts water to the lawn while keeping household water working normally.
Can high water pressure cause a sprinkler zone to stick open?
Yes. Irrigation valves are built to work within a specific pressure range, usually between 20 and 100 PSI. If your street pressure jumps above 80 or 90 PSI because of municipal pumping shifts, the hydraulic balance across the diaphragm can get shaky, and the top chamber can’t build enough relative pressure to beat the incoming rush and seat properly. In those cases, you need a pressure-reducing valve installed on your main line.
Related Articles
Keep troubleshooting with these hand-picked guides from FixlyGuide:
- The #1 Sprinkler Winterizing Mistake That Leads to $1,000s in Damage — Discover the crucial mistake homeowners make when winterizing sprinkler systems and how to avoid costly freeze damage with a simple, effect…
- The 3 Hidden Reasons Your Sprinkler Head Won't Pop Up (And How to Fix Them) — Frustrated by a sprinkler head that won't rise? Discover the top three culprits behind this common irrigation issue and how to resolve them…
- Water Pooling in Landscape Beds? 10 Steps to Stop Foundation Flooding — Fix standing water and poor drainage in landscape beds around your foundation with pro-tested regrading, downspout extensions, and sub-surf…
- White Crust on Your Garden Soil? 10 Steps to Clear Mineral Salt Buildup — White, chalky crust on your garden soil isn't mold—it's mineral salt buildup choking your roots. Here is how to test, scrape, and leach it…
- Grass Turning Yellow After Mowing? 5 Causes and How to Fix It — Grass turning pale or yellow after mowing? Discover the causes of mower scalping and torn blades, and learn the step-by-step fix to restore…
- Dishwasher Won't Fill With Water? 5 Causes and the Step-by-Step Fix — Dishwasher running dry? Learn how to diagnose a stuck float switch, unclog a water inlet valve, and test solenoid continuity with step-by-s…
Should you do this yourself?
Answer five quick questions before you start. Safety outranks savings every time.
Your experience with work like this
How high do you have to work?
Does the job involve any of these?
Will it need a permit?
Specialty tools
Free and instant. Educational guidance only — not a quote, inspection, or professional diagnosis.
What should this project cost?
Enter your project details for a realistic cost range before you call anyone.
Cost depends heavily on which system turns out to be the source.
- Regional adjustment
- National average
- Labor share (typical)
- ~$1,620
- Quotes to collect
- 3 written estimates
Educational estimate based on national averages — not a binding quote. Always confirm with written local estimates.
Before you start
Check the difficulty, permits, and safety risk — then decide whether to call a pro.
- Estimate this projectGet a cost range for your scope and ZIP before you call anyone.Open
- Get local estimatesSend one request and compare written estimates from vetted pros.Open
Free, no signup required. Estimates are educational guidance, not a quote or an inspection.
Get the print-ready PDF of this guide
A clean, ad-free, printable version you can keep on your phone or pin to the workshop wall. Free with a FixlyGuide account.
- Print-optimized layout
- Tools, materials & every step included
- Saved to your account
Frequently asked questions
If I unplug the sprinkler controller, will the stuck zone stop running?+
No, unplugging the controller will not stop a mechanically jammed valve. Irrigation valves are normally closed devices that require continuous electrical current to stay open; when they fail to shut off, it's almost always because grit, sand, or a torn rubber diaphragm is physically blocking the valve from closing hydraulically. If you unplug the timer and water keeps spraying, the issue is inside your valve box.
Where is my irrigation valve box located?+
Valve boxes are typically buried flush with your lawn or hidden inside landscaping beds near the foundation of your home. Look for dark green or black rectangular plastic lids measuring roughly 12 by 18 inches. If your lawn has overgrown them, gently probe spongy turf areas with a long, thin screwdriver or metal rod about 2 to 6 inches deep until you tap against plastic.
Can I buy just the rubber diaphragm without buying an entire valve?+
Yes, most major home improvement centers and dedicated irrigation supply houses sell diaphragm repair kits for popular brands for $8 to $15. However, it is often smarter to buy the entire complete valve off the shelf for $18 to $25. You can use its brand-new diaphragm, spring, bonnet, and solenoid as replacement parts while leaving the lower body in the ground.
How do I know which valve controls which sprinkler zone?+
Open the valve box and have a helper turn on specific zones at the controller. You can feel the water flow by resting your hand on the plastic bonnet; the running valve will vibrate slightly and feel noticeably colder than dormant valves. Alternatively, gently twist the manual bleed screw on top of a valve a half-turn counter-clockwise—if that causes the problem zone to kick on, you've found your valve.
Why does water keep bubbling out of only the lowest sprinkler head?+
This is known as low-head drainage. When a zone shuts off normally, the residual water inside the lateral pipes slowly drains downhill out of the lowest sprinkler nozzle via gravity. However, if that water trickles continuously for hours or days after the cycle stops, your in-line valve is not seating completely, leaking a steady stream of city water past its damaged diaphragm into the zone.
What causes a sprinkler valve solenoid to fail?+
Solenoids fail either electrically or mechanically. Electrically, lightning strikes or power surges can burn out the fine internal copper coil, or corroded underground wire splices prevent proper voltage delivery. Mechanically, hard-water mineral deposits can freeze the internal stainless steel plunger inside its sleeve, locking it in the retracted position and keeping the hydraulic exhaust port permanently open.
Do I need to turn off my home's main water to fix an irrigation valve?+
Only if your irrigation system doesn't have an isolated shutoff valve. Most building codes require a dedicated irrigation shutoff located either near your street meter, in the basement, or as part of an exterior backflow preventer assembly. Closing the two quarter-turn handles on your backflow device cuts water to your lawn while keeping household water fully functional.
Can high water pressure cause a sprinkler zone to stick open?+
Yes. Irrigation valves are engineered to operate within a specific pressure envelope, typically between 20 and 100 PSI. If your street pressure surges above 80 or 90 PSI due to municipal pumping shifts, the hydraulic balance across the diaphragm can destabilize, preventing the top chamber from building enough relative pressure to overcome the incoming rush of water and seat properly. In these cases, you need a pressure-reducing valve installed on your main line.
Discussion
Loading comments…