- Prep your vinegar soak bag — Grab a heavy-duty, quart- or gallon-sized freezer storage bag (standard sandwich bags tear too easily on the metal edges). Pour in 1.5 cups of 5% distilled white vinegar and 0.5 cup of hot tap water.
- Safety: Never mix vinegar with chlorine bleach; the combination produces toxic chloramine gas.
- For brushed nickel, oil-rubbed bronze, or matte black finishes, dilute the vinegar 50/50 with water to prevent stripping the protective clear coat.
Plumbing · Clog
| Project category | Plumbing |
|---|---|
| Problem type | Clog |
| Trade required | Plumbing |
| Urgency | Soon — within weeks |
| Safety risk | Low safety risk |
| DIY suitability | DIY friendly |
| Cost category | Low cost |
| Typical timeline | Same-day DIY attempt; pro visit within a day or two |
| Contractor type | Licensed plumber |
Repair option
Plunger, hand auger, or trap cleanout before chemicals.
Replacement option
Line replacement when clogs return in the same spot repeatedly.
Common causes
- Hair and soap buildup in the trap
- Grease cooling in the branch line
- Flushed wipes or foreign objects
Relevant tools:diy difficultydiy or hire a pro
Published November 9, 2026Last updated November 9, 2026
Tools & materials you'll need
Affiliate linksAs an Amazon Associate FixlyGuide earns from qualifying purchases — at no extra cost to you. Prices and availability are accurate as of publication and subject to change.
Quick Answer
To clear hard water crust and black mold clogging your showerhead nozzles, soak the faceplate in a 50/50 mix of warm water and 5% distilled white vinegar for 30 to 60 minutes. Scrub the rubber jets with a stiff nylon brush, poke stubborn openings with a wooden toothpick, and flush with hot water at full pressure. If deposits are fused solid, remove the showerhead with an adjustable wrench and boil-steep it in pure vinegar.
The Problem
You step into the shower expecting a steady, drenching spray. Instead, three stray needle-jets shoot sideways into your eyes while half the showerhead dribbles pathetic trickles down the wall. The water pressure in the rest of your house is fine—your kitchen sink blasts on command—so why is your morning shower so weak?
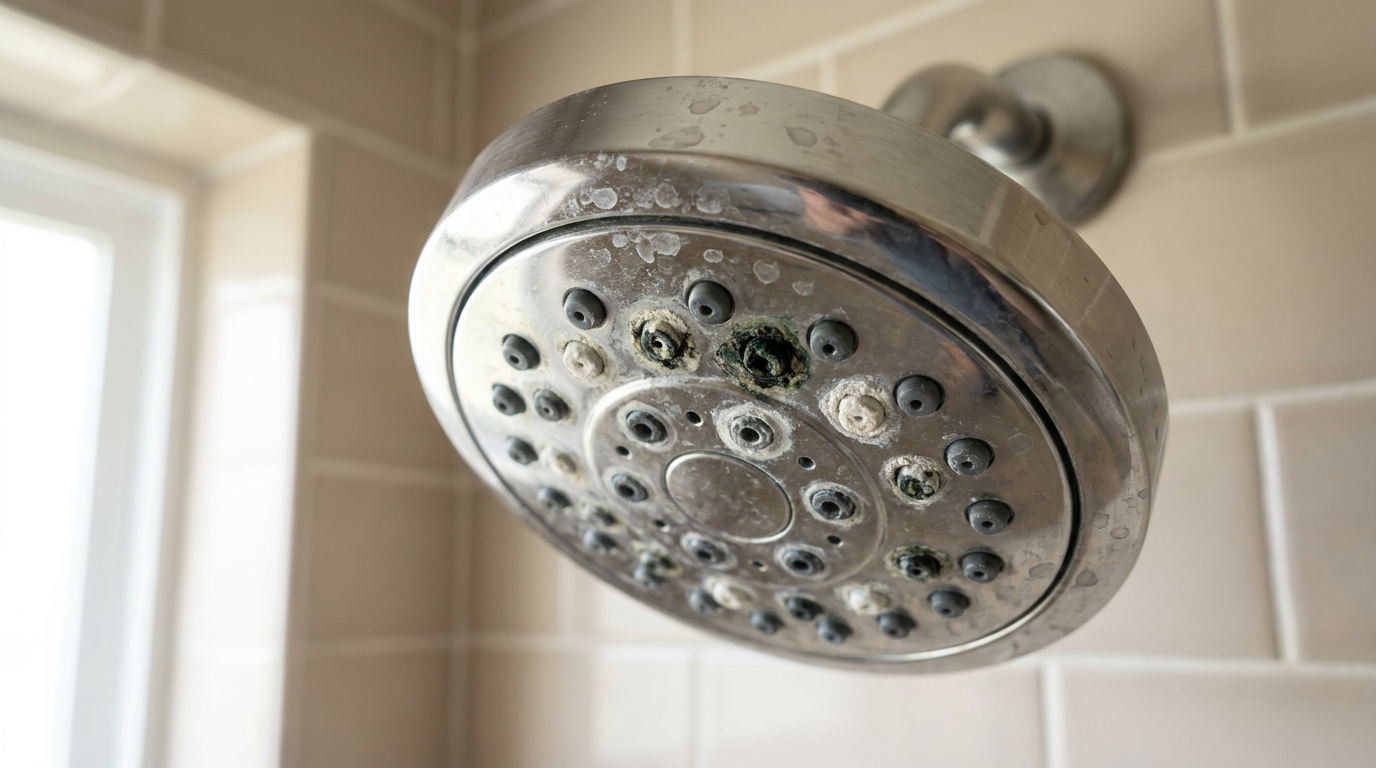
Look up at the faceplate. You'll see chalky, rock-hard white crust ringing the tiny holes, alongside slimy green or black rings hugging the soft rubber nozzles.
That crust is calcium carbonate and magnesium sulfate. When municipal water carries high dissolved mineral content—especially prevalent across regions with hard tap water like North Texas, the Midwest, and the Southwest—every droplet left behind after you turn off the valve evaporates. The water vanishes into the humid air, but the minerals stay right where they dried. Over months, these microscopic mineral sheets fuse into calcified stone, choking the 1/16-inch apertures down to pinholes or sealing them shut completely. Worse, that damp, mineral-encrusted recess acts as an incubator for biofilm: a sticky bacterial colony (Mycobacterium species thrive inside showerheads) that feeds on pipe scale and traps organic debris.
Spraying bathroom cleaner on the outside does next to nothing. Bleach won't dissolve rock; it just oxidizes the surface while corroding your finish. To get your water pressure back, you have to break the chemical bond between the mineral scale and the showerhead nozzles. I pulled a showerhead in Frisco last month that looked fine from ten feet away, but the face was packed so tight with scale I had to crack it open and soak it twice before it would spray worth a darn.
How It Works
Your showerhead is a miniature pressure-distribution manifold. Water enters the threaded 1/2-inch National Pipe Thread (NPT) inlet pipe at roughly 45 to 80 pounds per square inch (psi). Before reaching the spray face, that stream passes through a fine mesh debris screen and a flow restrictor—a small plastic disc with an O-ring engineered to cap output at 1.8 to 2.5 gallons per minute (gpm) under federal standards.
From the restrictor cavity, water fills an internal pressure chamber behind the faceplate. This chamber distributes water evenly across 40 to 120 individual silicone or plastic nozzles. For the spray pattern to remain uniform, backpressure inside that chamber must stay balanced.
When calcium deposits block just 20% of those tiny orifices, internal turbulence spikes. Water diverts toward whichever holes remain partially open, blasting erratic streams at weird angles. Meanwhile, the mineral buildup creeps backward through the nozzles, coating the flow restrictor and trapping loose pipe rust and sediment flakes behind the mesh screen.
Standard alkaline detergents cannot break down calcium carbonate. To dissolve hard scale without destroying the plastic and brass internals, you need a mild acid. Distilled white vinegar contains roughly 5% acetic acid ($CH_3COOH$). When acetic acid contacts calcium carbonate ($CaCO_3$), a chemical reaction produces calcium acetate, water, and carbon dioxide gas:
$$2CH_3COOH + CaCO_3 \rightarrow Ca(CH_3COO)_2 + H_2O + CO_2$$
Calcium acetate is water-soluble. The hard rock literally converts into a liquid salt that washes down the drain.
Step-by-Step Fix
Follow these steps to descale your showerhead, clear blocked jets, and restore your water pressure to factory spec.
-
Test the rubber nozzle flex — Before breaking out tools, take your thumb and vigorously scrub across the face of the showerhead while the water is running hot. Modern showerheads use pliable silicone or neoprene jets designed to crack mineral scale when deformed. If your buildup is light, rubbing the nozzles back and forth will pop the brittle calcium plugs right out of the tips.
- If water streams straighten out immediately, you're done; if chalky residue remains or jets are dead, proceed to chemical soaking.
-
Prep your vinegar soak bag — Grab a heavy-duty, quart- or gallon-sized freezer storage bag (standard sandwich bags tear too easily on the metal edges). Pour in 1.5 cups of 5% distilled white vinegar and 0.5 cup of hot tap water.
- Safety: Never mix vinegar with chlorine bleach; the combination produces toxic chloramine gas.
- For brushed nickel, oil-rubbed bronze, or matte black finishes, dilute the vinegar 50/50 with water to prevent stripping the protective clear coat.
-
Submerge the showerhead in place — Slip the liquid-filled bag up over the showerhead until the faceplate and all spray nozzles are completely submerged. Squeeze excess air out of the top of the bag so the vinegar level rises around the neck.
- Wrap a thick rubber band or zip-tie tightly around the top of the bag where it gathers against the shower arm.
- Double-knot it so the weight of the liquid doesn't slip off mid-soak and splatter all over your tile.
-
Time the soak according to your finish — Let the acid do the heavy lifting while keeping a close eye on the clock.
- Chrome finishes can handle a 2- to 3-hour soak safely.
- Brass, nickel, or specialty coated finishes must not soak longer than 30 to 45 minutes; prolonged acid exposure can cause surface pitting or dark discoloration.
- If your unit is heavily encrusted and won't clear with a bag soak, skip to step 6 to remove the unit completely.
-
Scrub and purge the loosened scale — Cut the zip-tie, pull the bag away, and immediately attack the faceplate with a stiff-bristled nylon utility brush or an old toothbrush. Press the bristles deep into the rubber nozzles using small circular motions. Turn the shower valve to full hot for 60 seconds to blast out the dissolved slurry from inside the spray channels.
- Inspect each jet; if rogue needles of water still spray sideways, move to mechanical unclogging.
-
Shut off water and detach the showerhead — For deeply neglected fixtures, remove the unit entirely to clear the internal filter screen. Wrap two layers of electrical tape or a rag around the shower arm's faceted nut to protect the finish. Grip the nut with an adjustable crescent wrench and turn counterclockwise (lefty-loosey).
- Hold the shower pipe coming out of the wall with your other hand; do not let the wall pipe twist, or you could snap an elbow fitting inside your drywall.
-
Extract and clean the inlet mesh screen — Look inside the threaded female inlet of the removed showerhead. You'll find a small rubber gasket with a fine stainless-steel or plastic mesh screen centered inside it. Pry the gasket out gently using needle-nose pliers or a small flathead screwdriver.
- Rinse the screen backward under a strong faucet stream to blow out trapped sand, rust scale, and municipal sediment flakes.
- Soak the screen in a small bowl of straight vinegar for 15 minutes to clear lime film.
-
Clear individual nozzles with a wooden probe — Set the showerhead face-up on a towel. Take a wooden toothpick and gently push it straight into every blocked nozzle opening, rotating it slightly to ream out calcified rings.
- Critical: Never use metal sewing needles, safety pins, or paperclips. Hard steel wallows out soft silicone holes, scratching the internal jet or widening the aperture, which permanently ruins your spray pattern.
-
Deep-soak disassembled components — Submerge the detached showerhead face-down in a plastic bowl filled with heated vinegar (microwave 2 cups of vinegar for 60 seconds until steaming, around 130°F to 140°F). Warm acid reacts three times faster than room-temperature liquid. Let it sit for 45 minutes. Slosh it vigorously every 15 minutes to dislodge internal sediment chunks.
-
Clean the shower arm threads — While the head is soaking, inspect the male threads on the pipe protruding from the wall. Scrape away shredding bits of old, brittle plumber's tape using your wire or nylon brush. Wipe the threads clean with a dry microfiber rag until the metal grooves are sharp and bare.
-
Apply fresh PTFE thread-seal tape — Take a roll of 1/2-inch white PTFE (Teflon) tape. Starting at the base of the pipe threads, wrap the tape clockwise (in the direction you will screw the head on) for 3 to 4 complete, tight revolutions.
- Wrapping counterclockwise will cause the tape to bunch up and unthread as you spin the fixture back on, creating a slow drip down your wall.
- Reassemble and test for leaks — Press the clean mesh screen and rubber washer firmly back into the showerhead inlet. Thread the showerhead onto the arm by hand until snug. Snug it an additional 1/4 to 1/2 turn with your taped crescent wrench—do not overtighten, or you will crack the internal plastic threads. Turn the shower on high. Watch the threaded joint for drips while confirming a straight, full, stinging spray pattern across every single jet.
Common Causes
Why do shower nozzles clog so quickly in some homes while lasting years in others? Five primary factors drive the problem:
- High Total Dissolved Solids (TDS): Water containing over 120 parts per million (ppm) or 7 grains per gallon of dissolved calcium and magnesium will coat surfaces rapidly. Every time water shuts off, surface tension holds droplets inside the nozzles. Those drops evaporate within two hours, leaving rock crystals behind.
- Low-Flow Aerator Physics: Modern 1.8 gpm eco-heads feature microscopic jet orifices compared to older 3.5 gpm fixtures. Smaller holes mean even paper-thin mineral banding cuts water volume dramatically.
- Galvanized Pipe Flaking: Older homes with galvanized supply lines slowly corrode from the inside out. Tiny specks of iron oxide break free and ride the water column up into the shower arm, packing tight against the filter screen and nozzle bases.
- Municipal Water Main Flushes: When your city flushes fire hydrants or repairs a main street line, high-velocity surges dislodge massive slugs of mineral sediment and silt. These particulates hit your bathroom fixture within minutes, blinding the nozzle manifold instantly.
- Warm Biofilm Growth: Showerheads sit in a dark, 75°F to 105°F humid environment loaded with organic soap mist. Opportunistic bacteria colonize the interior plastic walls, forming an adhesive slime that binds loose lime dust into thick, rubbery plugs.
Common Mistakes
- Using chlorine bleach to dissolve lime. Bleach is an oxidizer and a disinfectant, but it has a high, alkaline pH (around 11 to 13). It possesses zero chemical capability to dissolve alkaline calcium rock. Worse, chlorine attacks the nickel, chrome, and copper substrates of your fixture, causing pitting and yellowing.
- Reaming nozzles with paper clips or sewing needles. Steel needles seem convenient, but they ream soft silicone jets oval-shaped and gouge internal brass restrictors. Once an aperture is oversized or burred, the water stream will shoot sideways forever. Stick strictly to bamboo skewers or round wooden toothpicks.
- Soaking specialty finishes overnight. A six-hour vinegar bath will dissolve mineral crust, but it will also strip the protective lacquer coat off oil-rubbed bronze, matte black, and unlacquered brass. Limit acid exposure on colored or living finishes to 30-minute intervals, rinsing thoroughly between rounds.
- Overtightening the showerhead nut. Homeowners often grab pipe wrenches and lean into the fitting with all their weight. Most modern showerheads use brass or engineered ABS plastic internal ball joints. Cranking past 10 to 15 ft-lbs will crack the female housing or flatten the rubber washer, causing persistent leaks at the ball swivel.
- Wrapping Teflon tape counterclockwise. If you wrap thread tape to the left, the leading edge of the tape will catch on the female threads as you spin the head on, rolling the tape up into a useless ball. Always wrap clockwise looking directly into the open pipe.
Cost & Time Breakdown
| Task | DIY Cost | Pro Cost | Time |
|---|---|---|---|
| Exterior Vinegar Bag Soak | $1–$3 | $85–$125 | 45–60 mins (mostly passive) |
| Complete Tear-Down & Screen Cleaning | $5–$8 | $120–$175 | 30–45 mins active |
| Gasket & Flow Restrictor Replacement | $4–$10 | $95–$140 | 15–20 mins active |
| Upgrading to Self-Cleaning Silicone Head | $25–$65 | $150–$250 | 20–30 mins active |
Tips & Prevention
- Make the "thumb sweep" a post-shower ritual. Once a week, right after shutting off the water while the nozzles are still warm, swipe your thumb firmly back and forth across the silicone spray jets. Cracking the lime while it's damp prevents it from crystallizing into stone.
- Squeegee and vent. Run your bathroom exhaust fan for at least 20 minutes after bathing. Lowering relative humidity speeds up ambient drying and prevents the stagnant, steamy incubator environment that feeds nozzle biofilm.
- Inspect the inlet screen annually. Even with clean nozzles, a choked intake mesh strangles flow. Unthread the fixture once every 12 months, invert it under a faucet, and tap out accumulated water-main grit.
- Consider a point-of-use shower filter. If you rent or aren't ready for a whole-house water softener, screw an inline kinetic degradation fluxion (KDF) and calcium-reduction filter between the shower arm and the head ($25 to $40). It won't soften water completely, but it substantially reduces the scale accumulation rate.
When to Call a Professional
If you've soaked the showerhead in warm vinegar, poked out every nozzle, confirmed the inlet screen is crystal clear, and the spray is still a weak trickle, the problem isn't mineral crust on the fixture. You're likely dealing with a failed pressure-balancing spool or a clogged cartridge inside the shower mixing valve buried in your wall.
Replacing a shower valve cartridge requires shutting off the main water supply, pulling decorative trim, and extracting stuck brass or plastic sleeves without warping the copper manifold. If you pull the old cartridge incorrectly or strip the valve body, you can snap internal solder joints, unleashing an in-wall flood. Similarly, if your shower pipe feels loose or twists inside the wall when you attempt to unscrew the showerhead, stop immediately. A licensed plumber can secure the drop-ear elbow inside the wall framing or pull and replace a seized pressure-balancing cartridge in under an hour.
Related Articles
Keep troubleshooting with these hand-picked guides from FixlyGuide:
- The Invisible Film Making Your Bathroom Mirror Streaky – And How to See Clearly — Discover why your bathroom mirror always looks streaky, even after cleaning, and learn the pro trick to get a perfectly clear, fog-free ref…
- The Deep Carpet Divots: Your Secret Weapon Against Furniture Marks — Tired of stubborn furniture indentations marring your carpet? Discover why they form and a surprisingly effective, simple method to restore…
- That Brown Ring Around Your Bathtub? It’s Not Just Soap Scum. — The persistent brown ring in your bathtub isn't just soap scum; it's often a mineral deposit or mold/mildew, requiring specific cleaning st…
- Dishwasher Not Draining? 6 Reasons for Standing Water (and How to Fix It) — Seeing a puddle of dirty water in your dishwasher after a cycle is a common, fixable problem—here's how to diagnose and clear the clog, fro…
- Window Tracks Full of Gunk? How to Get the Grime Out for Good — Your windows won't glide smoothly if the tracks are packed with dust, dead bugs, and sticky grime. Here's how to deep clean them with simpl…
- That 15-Minute Brew? Your Coffee Maker's Secret Clog — A slow-dripping coffee maker is almost always a sign of internal mineral buildup, not a faulty machine, and a simple vinegar descaling can…
What should this project cost?
Enter your project details for a realistic cost range before you call anyone.
Cost depends heavily on which system turns out to be the source.
- Regional adjustment
- National average
- Labor share (typical)
- ~$1,620
- Quotes to collect
- 3 written estimates
Educational estimate based on national averages — not a binding quote. Always confirm with written local estimates.
Get the print-ready PDF of this guide
A clean, ad-free, printable version you can keep on your phone or pin to the workshop wall. Free with a FixlyGuide account.
- Print-optimized layout
- Tools, materials & every step included
- Saved to your account
Frequently asked questions
What is the best vinegar to use for descaling a showerhead?},{answer:+
Distilled white vinegar is the gold standard because its 5% acetic acid content reliably dissolves calcium carbonate without eating through silicone nozzles or chrome plating. Cleaning vinegar (6% acidity) works slightly faster. Avoid malt or cider vinegars, which leave behind sticky organic sugars.
Discussion
Loading comments…